
 Excavator
316 models
 Backhoe Loader
54 models
 Crane
68 models
 Concrete Mixer
79 models
 Wheel Loader
65 models
 Compactor / Roller
45 models
 Motor Grader
42 models

 Concrete Pump
66 models
 Skid Steer Loader
11 models


A tipper maintenance checklist for the tipping gear comes down to three habits: check the hydraulic oil level and look for leaks before every shift, grease the cylinder mounts and body hinges on schedule, and change the hydraulic oil every six to twelve months, with its filters at least as often. The truck’s own service book covers the engine, gearbox, axles and brakes. The gear the bodybuilder bolted on top is the half most owners forget, until the body will not rise.
The intervals below are taken from three working documents: the Border Roads Organisation’s maintenance instructions for Ashok Leyland and AMW tippers, the operator’s manual of the tipping-gear maker Edbro, and BharatBenz’s body-building rules for its tipper chassis. Where they disagree, and on hydraulic oil they do, this guide shows both figures and tells you which one to follow.
What should a tipper maintenance checklist cover?
It should cover every part between the gearbox and the tailgate. Power for tipping comes from the truck’s engine: a power take-off (PTO) on the gearbox drives a hydraulic pump, the pump pushes oil from a small tank through a control valve, and a cylinder lifts the front of the body while the rear turns on a hinge. The guide to types of tipper truck explains that system and the difference between front-end and underbody cylinders. Here we deal with keeping it working.
Do not assume your service contract covers this. Mahindra’s annual maintenance terms for its tippers list “daily checks and daily washing and greasing” among the items the contract does not include, and make the customer responsible for the daily checks in the operator’s service book. The same is true on most fleets: the workshop changes the oil, the driver keeps the grease points full.
Table 1: Tipping-gear parts and what goes wrong when they are neglected
| Part | What it does | What neglect looks like |
|---|---|---|
| PTO (power take-off) | Takes drive from the gearbox to the pump | Grinding when engaged, oil leaks at the gearbox face, loose mounting bolts |
| Hydraulic pump | Turns the PTO’s drive into oil flow and pressure | Oil dripping from the small weep hole, which means a shaft seal is going |
| Oil tank and breather | Holds the oil and lets air in and out as the cylinder moves | Low level, dirty oil, a choked breather that pulls a vacuum in the tank |
| Control valve and hoses | Send oil to the cylinder to raise, hold and lower the body | Kinked or chafed hoses, weeping joints, a body that creeps down in “hold” |
| Tipping cylinder | Telescopic ram that lifts the body | Leaks at the ram tubes, a loose base ram nut, worn trunnion pins, jerky lifting |
| Rear hinge and brackets | The pivot the body turns on | Dry, noisy or seized pins, oval holes in the brackets |
| Body floor and tailgate | Carry the load and let it out | Cracked welds, a dished floor, a tailgate that does not lock or swing freely |
What is the full tipper maintenance checklist, by interval?
Here is the full schedule in one table. The source column tells you whose figure it is, because the documents were written for different trucks and climates. Always put the bodybuilder’s or tipping-gear maker’s own manual first if you have it. Edbro’s manual says other checks may be needed depending on the equipment and that the bodybuilder should advise them.
Table 2: Tipper maintenance checklist by interval
| When | Check or job | Source |
|---|---|---|
| Every day, before work | Hydraulic oil level in the tipping tank, with the body fully down; leaks at the PTO, pump, valve, hoses and cylinder; hoses not rubbing or kinked; pneumatic and hydraulic joints tight; tyre pressure | BRO instruction for the AMW 2523 TP tipper (daily list); Edbro manual (checks before use) |
| Every day | Grease the ram base, the ram cross-head and the tipper body hinges | BRO instruction for the Ashok Leyland Taurus 2516/2 tipper; the AMW instruction says “lubricate all greasing points” daily |
| Every day, at the first tip | The PTO warning light comes on when the PTO is engaged and goes out when it is released | Edbro manual |
| Every week | Tighten the fasteners on the tipping gear’s sub-frame; check hose nuts and hydraulic fittings | BRO instruction for the AMW tipper (weekly list) |
| Every week or month | Top up the oil to the dipstick mark with clean oil; grease every point on the cylinder and hinge with a multi-purpose grease | Edbro: weekly for its C-series hoists, monthly for its CS and CX hoists |
| Every month | Grease the tailgate hinges and lock; replace worn or damaged hoses; clip loose hoses to the chassis; report a loose outer cover, damaged ram tube, loose base ram nut or worn trunnion and hinge brackets | Edbro manual |
| Every three months | Use spanners on the fixing bolts of the tipper valve, PTO and brackets | Edbro manual |
| Every four months (two in dust) | Replace the air breather element and the return-line filter element | BRO instruction for the AMW tipper |
| Every six months | Change the tipping-unit oil | BRO instruction for the Ashok Leyland Taurus; the AMW instruction says first change at four months, then twice a year (every 1,200 hours, 6 months or 75,000 km) |
| Every year (more often in dust) | Drain and refill the tank with clean oil; inspect the outer cover tube behind the trunnion ring for rust; check the cover stud torque | Edbro manual |
Print the daily and weekly rows and keep them in the cab. The rest belongs in the workshop’s job card.
Where are the grease points on a tipper, and how often should you grease them?
A front-end tipper has grease nipples at both ends of the tipping cylinder and on the rear body hinges, plus the tailgate hinges and lock. The cylinder’s lower end sits in a cradle bracket on the chassis and its upper end in a lifting bracket under the front of the body; both pivot every time the body goes up. On an underbody tipper the cylinder sits under the floor, and its two mounts carry the grease points instead.
How often depends on whose instruction you follow. The Border Roads instruction for the Ashok Leyland Taurus 2516/2 tipper greases the ram base, the ram cross-head and the body hinges every day. Edbro, which makes the cylinder rather than the truck, asks for greasing weekly on its C-series hoists and monthly on its CS and CX hoists. For an Indian tipper hauling sand, stone or muck every day, follow the daily figure. The grease is cheap. The pins and bushes are not.
Dry pins are the most common fault on a neglected tipper. In a 2018 Transport Engineer feature, a tipper bodybuilder described a rear hinge bracket that had seized because it had not been greased in five years. Edbro’s sales and marketing director told the same magazine that the cavity around the base of a cylinder takes about a litre of grease. If grease will not go in, the nipple is blocked or missing; replace it before the next shift, do not skip it.
Use a multi-purpose grease of the kind the chassis already takes. The Ashok Leyland instruction lists an NLGI 2 multi-purpose grease to IS 12203 for its chassis greasing. The guide to greasing and lubrication explains how to grease a pin so the old grease is pushed out, and pins and bushes explains when a worn pin needs replacing rather than more grease.
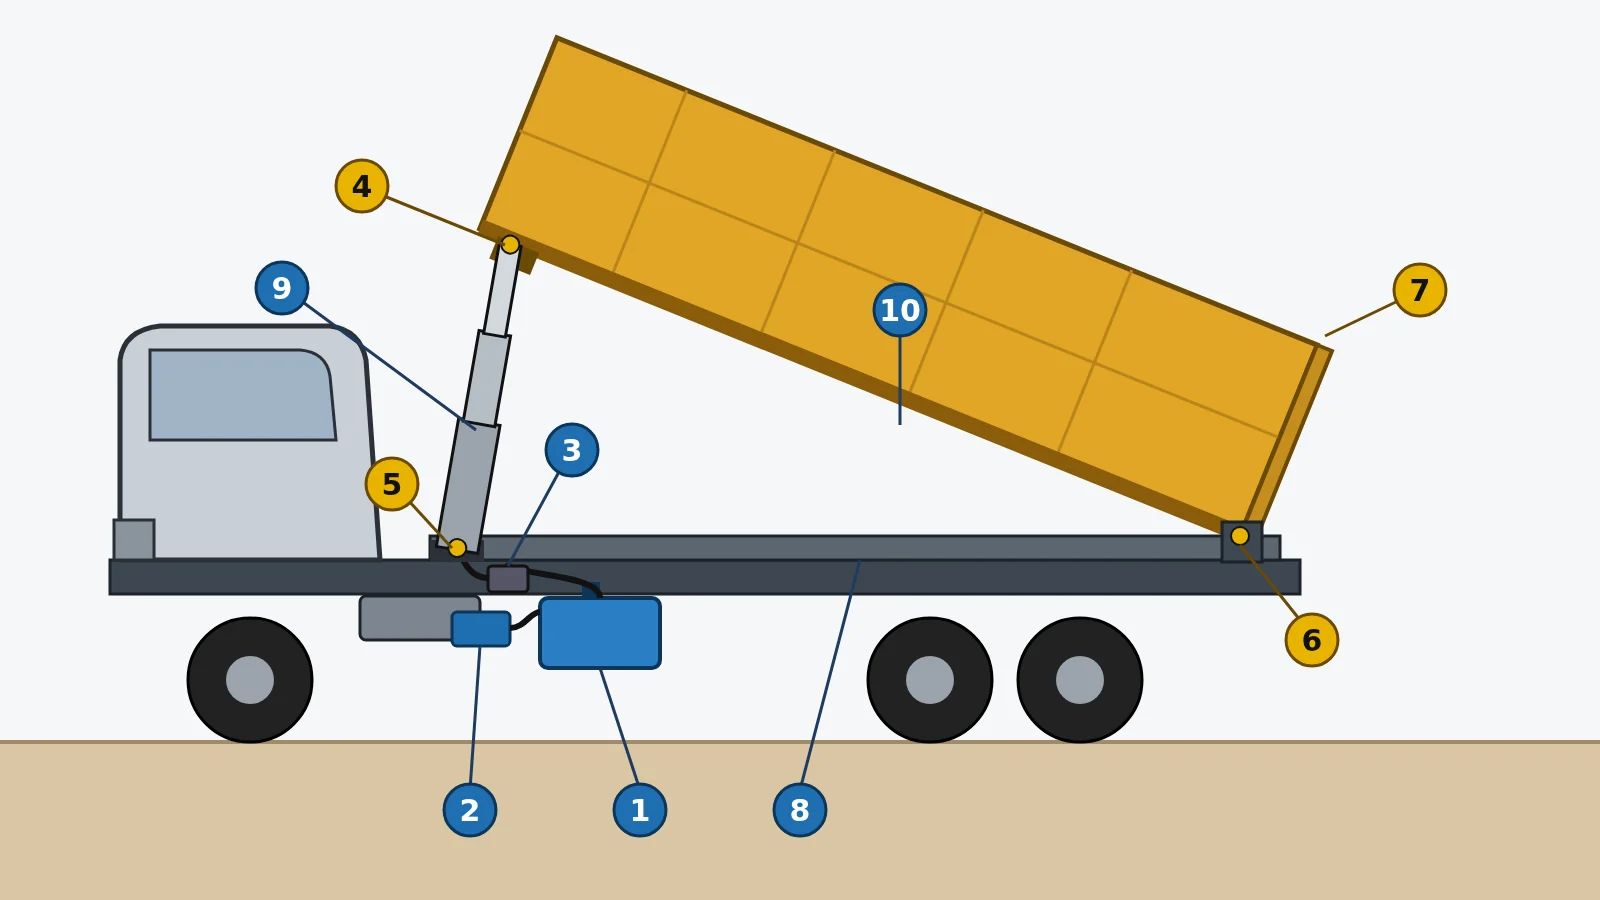
- Oil tank, dipstick and breather: oil level daily, breather element every four months.
- PTO and pump on the gearbox: leaks and the pump’s weep hole daily, bolts every three months.
- Control valve and hoses: kinks, chafing and weeping joints daily.
- Cylinder top mount under the front of the body: grease.
- Cylinder base in its cradle bracket on the chassis: grease, and check the base ram nut.
- Rear body hinge: grease, and look for oval holes in the brackets.
- Tailgate hinges and lock: grease monthly.
- Sub-frame and bracket bolts: tighten weekly.
- Cylinder tubes: leaks, dents and rust on the outer cover.
- Body floor: cracked welds and a dished floor.
Which hydraulic oil goes in a tipper, and when should you change it?
Use the grade on the tipping gear’s own plate or in its manual, and change it every six to twelve months. The documents do not agree on one grade, and that is the point to understand before you buy a drum.
Hydraulic oil is sold by two labels. The letters (HM, or HLP in the German standard) mean a mineral oil with anti-wear additives, which is what tipping gear needs. The number is the ISO viscosity grade (VG): VG 32 is thinner, VG 68 is thicker and holds its body better when the oil runs hot.
Table 3: Tipping-gear hydraulic oil in three maintenance documents
| Document | Oil it names | Oil change | Filters and breather |
|---|---|---|---|
| BRO instruction, Ashok Leyland Taurus 2516/2 tipper (gear by Wipro, UT or Hyva) | ISO VG 32 anti-wear oil to IS 10522 | Every 6 months | Not listed |
| BRO instruction, AMW 2523 TP tipper with Hyva box body | ISO VG 68 hydraulic oil; tank holds 60 litres | First at 4 months, then twice a year (1,200 hours, 6 months or 75,000 km) | Breather and return filter every 4 months, every 2 months in dusty work |
| Edbro operator’s manual E5322/6 (October 2023), CX and CS hoists | HM32 (ISO 6743-4), for -20°C to +30°C; other climates: ask the distributor | Every year, more often in dust or dirt | Never power-wash near the breather; clean it with a cloth |
Read the Edbro line carefully. Its VG 32 recommendation is for temperatures up to 30°C, and Indian sites run well above that for months of the year. That is why one Indian document asks for VG 68 and another for VG 32 on different gear, and why the plate on your own tank or cylinder decides. The Ashok Leyland instruction adds a rule worth keeping: do not mix oils of different brands or grades.
Check the level with the body fully down, because a raised body holds oil in the cylinder. The AMW instruction puts the correct level about 5 cm below the top of the tank; Edbro’s dipstick has a green maximum mark and a red minimum mark. When you change the oil, change the return filter and breather element at the same time. Hyva’s service kit for its tipping systems puts those parts in one box: a return filter element, an air breather element, a grease cartridge and a sticker for the next service date.
Dirty oil is what kills the pump and the cylinder seals. Edbro’s manual opens its oil section with “Dirty oil is the enemy of a hydraulic system”, and asks for clean oil only, never used oil poured back. The hydraulic tank and breather guide shows what a choked breather does to a tank, and hydraulic system maintenance covers oil sampling and hose care in more depth.
How do you look after the PTO and pump?
Most PTO and pump failures start with how the driver engages them, not with wear. Four rules from the documents cover nearly all of it.
First, engage and release the PTO only with the truck standing still. BharatBenz’s body-building guidelines for its heavy-duty trucks (June 2020) states that a gearbox-driven PTO can only be engaged and disengaged with the vehicle stationary. Press the clutch and wait before you engage: Edbro says 4 seconds, or 8 seconds for a gearbox with a rear-mounted PTO, and the AMW instruction says pause a few seconds before shifting the PTO into mesh.
Second, never drive with the PTO engaged. The AMW instruction and the Edbro manual both say it in so many words, and Edbro’s combined control releases the PTO automatically when the lever moves to “lower” for exactly that reason. If your truck has a separate PTO switch, switch it out before you move.
Third, keep the engine speed in the band the PTO and pump were sized for. Edbro tells drivers to raise the body by varying the revs and never to exceed 1,100 rpm on its own hydraulics, unless the PTO and pump maker allows more. BharatBenz’s guideline sets the other end: the PTO ratio is chosen so the engine holds at least 650 to 800 rpm under load.
Fourth, watch the weep hole. A pump has seals that keep its hydraulic oil apart from the gearbox oil. Edbro’s sales and marketing director explained in the Transport Engineer feature that a failing seal can flood the gearbox with hydraulic oil, and that most pumps have a small tell-tale hole that drips when that seal starts to go. A drip there is a workshop job this week, not next month.
BharatBenz adds one limit that matters if the PTO also drives other equipment: a PTO without an oil cooler is approved only for brief running at full power, about 30 minutes, followed by at least 30 minutes off. A normal tip lasts well under a minute, so this bites only when the same PTO runs a pump for long spells.
What should you check on the cylinder, hinges, body floor and tailgate?
Before you go under the body for any of these checks, prop it. Edbro treats a body prop as an essential safety requirement for any work with the body raised: never prop a loaded body, set the prop between the body and the chassis rather than on the ground, and lower the body gently onto it. The Border Roads instruction for the AMW tipper says the same in one line: do not stay and work under a raised or unsupported body.
On the cylinder, look for oil on the ram tubes and for loose gland nuts, where visible thread is a sign of loosening. Check that the outer cover is not loose and that the base ram nut is tight. Edbro sets a clear wear limit for the trunnion pins the cylinder pivots on: act when wear reaches 5% of the trunnion diameter, typically about 3 mm in total, by replacing the bracket bushes, the brackets or the cylinder’s base tube. Once a year on older cylinders, lift the rubber ring above the top retaining ring and look for rust on the outer cover tube; this matters most on trucks that work near the coast or get power-washed often. Never steam-clean the exposed cylinder tubes.
At the rear hinge, the pins should turn without noise and the bracket holes should still be round. An oval hole means the pin has been running dry. The same check applies to the tailgate hinges, and the lock should close fully with the gate seated.
Look along the body floor and sides for cracked welds at the cross-members and for a floor that has dished between them, especially on stone and boulder work. How long a floor lasts, and when to repair or re-body, is covered in our post on the Hardox tipper body. Much floor and hinge damage starts with loads above the truck’s rating; tipper capacity explains how to work out the right load.
Keep the tyres at the maker’s pressure as part of the daily walkaround. Edbro’s safety code puts it first in its list of things to always do. Tread wear and replacement are covered in tipper tyre life.
Why will a tipper body not lift, and what can the driver check?
When the body will not lift, the cause is usually one of five simple things, and the driver can check all of them without tools. Edbro’s problem-solving page lists them:
- The air pressure has not built up yet. The AMW instruction says to wait for 6 bar (87 psi) before tipping.
- The oil in the tank is below the mark.
- The PTO is not engaged, so no oil is circulating. Check the warning light.
- The tipper lever is not in “raise”.
- A hose is kinked.
If the body stops part of the way up, lower it as slowly as possible and check two things: whether the load is too heavy or piled to one end, and the oil level. If the hoist lifts in jerks or feels sluggish, air is trapped in the system. Check the oil level, then raise and lower the body through its full stroke several times so the air works back to the tank. If it stays jerky, the cylinder needs bleeding through its bleed screw, which is a job for someone trained, because oil escapes under pressure.
If the body will not stay up with the lever in “hold”, or will not come down at all, Edbro’s manual gives a short procedure for each; if it fails, call the tipping gear’s service dealer. The procedure for a body that will not lower ends with an instruction to prop the body, switch the PTO out and turn the engine off. Never put anyone under the body while you wait.
Grinding as the PTO engages, a loud whine from the pump or oil in the gearbox are workshop problems. So is any thought of turning up the pressure: the AMW instruction says not to change the pressure setting, and Edbro says its relief valve is set at the factory and must never be altered.
Should you fit automatic greasing on a tipper?
Fit it if your drivers change often or the tipper works long shifts in dust. In the same Transport Engineer feature the bodybuilder whose hinge had seized called automatic lubrication “the answer” to missed grease points, and said customers often will not fit it because of the cost. A small pump then feeds the points through fixed lines on a timer, including the ones nobody can reach without lifting the body.
It does not remove the daily walkaround. Lines can be cut or blocked, and the oil, hose and bolt checks still need a person. How these systems work and what they need is in the guide to automatic lubrication systems.
The machine that loads your tippers needs the same daily care at its own pins and hoses. If you are adding one to the fleet, compare excavators and backhoe loaders with prices and specifications, and talk to a dealer near you.
Sources and how this checklist was built
The daily, weekly and lubricant figures are from three Border Roads Organisation General Maintenance Instructions: No. 217 (Ashok Leyland Taurus 2516/2 dumper/tipper), No. 218 (Ashok Leyland CT 1613/H1 tipper, dated July 2008) and No. 239 (AMW 2523 TP tipper with a Hyva box body). All three were written for BS-II era trucks and read in a 2020 online copy, so check intervals against your own truck’s service book. The monthly, three-monthly and yearly jobs, the oil grade note, the trunnion wear limit and the problem-solving steps are from Edbro’s Operator’s Manual E5322/6 (CX and CS hoists, October 2023) and its C-series operator’s manual. PTO rules are from BharatBenz’s body-building guidelines for heavy-duty trucks (June 2020). The service kit contents are from Hyva’s service maintenance kit sheet, the contract exclusions from Mahindra’s tipper AMC terms, and the workshop quotes from Transport Engineer’s tipper maintenance feature of July 2018. All were read in November 2026.
For the machines that fill your tippers, genuine filters, hoses and seals come through the brand’s dealer on the spare parts page. More haulage guides are on the tippers and dumpers hub.
Prices, specifications and features are indicative, vary by variant, location and date, and should always be confirmed with the official OEM or authorised dealer before any purchase decision. Service intervals and oil grades differ between tipping-gear makers and models; follow the manual and plate of the gear fitted to your truck. DesiMachines is not liable for decisions taken on the basis of information that may have changed after publication.