
 Excavator
316 models
 Backhoe Loader
54 models
 Crane
68 models
 Concrete Mixer
79 models
 Wheel Loader
54 models
 Compactor / Roller
45 models
 Motor Grader
42 models

 Concrete Pump
66 models
 Skid Steer Loader
11 models


A house in India goes up in ten stages, and the order does not change from one plot to the next: site preparation and setting out, excavation, anti-termite treatment and the PCC bed, footings, plinth, columns and walls, the roof slab, services, plaster, and finishing. Each stage starts only when the one before it is finished and, where concrete or mortar is involved, has been cured for the number of days the Indian Standards ask for.
Those waiting days are the part most owners do not plan for. A slab can be cast in a day, but the props under it stay for one to three weeks, and inside plaster below it cannot start until they are out. This guide walks through each stage in order, gives the waits from IS 456, IS 2212, IS 1661 and IS 6313, and works out how many labour-days the main stages take on a 1,000 sq ft (93 m²) house.
There are no rupee figures here. How the bill splits across these stages is worked out in stage wise construction cost, and the total in the house construction cost calculator.
What are the stages of house construction?
The ten stages below are for an ordinary one or two storey house with an RCC frame (columns, beams and slab of reinforced concrete) and brick or block walls. A load-bearing house, where the walls carry the roof and there are no columns, follows the same order without the column work.
| Stage | What gets done | What must be finished before it starts |
|---|---|---|
| 1. Site preparation and setting out | Clearing, levelling, marking the centre line of every wall and column on the ground | Approved drawings, soil report, plot boundaries fixed |
| 2. Excavation | Digging trenches and pits for the footings | Setting out checked against the drawing |
| 3. Anti-termite treatment and PCC | Chemical on the pit floor and sides, then a plain concrete bed | Pits at full depth and dry |
| 4. Footings | Reinforced footings with the column bars standing up out of them | PCC bed set, steel checked against the drawing |
| 5. Plinth | Plinth beam or plinth masonry, backfill, plinth filling, damp-proof course | Footings cured, backfill soil treated |
| 6. Columns and walls | Columns cast in lifts, brick walls raised, lintels over doors and windows | Plinth level and damp-proof course done |
| 7. Roof slab | Shuttering, steel, conduits and sleeves, casting, curing, props | Columns at full height, beam and slab steel checked |
| 8. Services | Water, drain and electrical pipes laid in wall chases; door and window frames fixed | Walls finished and cured |
| 9. Plaster | Ceiling and inside walls, then outside walls from the top down | Frames, pipes and conduits in; slab props removed |
| 10. Finishing | Roof and toilet waterproofing, flooring and tiles, doors, windows, putty and paint, fittings | Plaster cured and dry |
Two storeys repeat stages 6 and 7 for each floor. IS 456 expects work to carry on above a new slab, which is why it asks for the props left under it to carry the slab’s own weight plus any load from further construction.
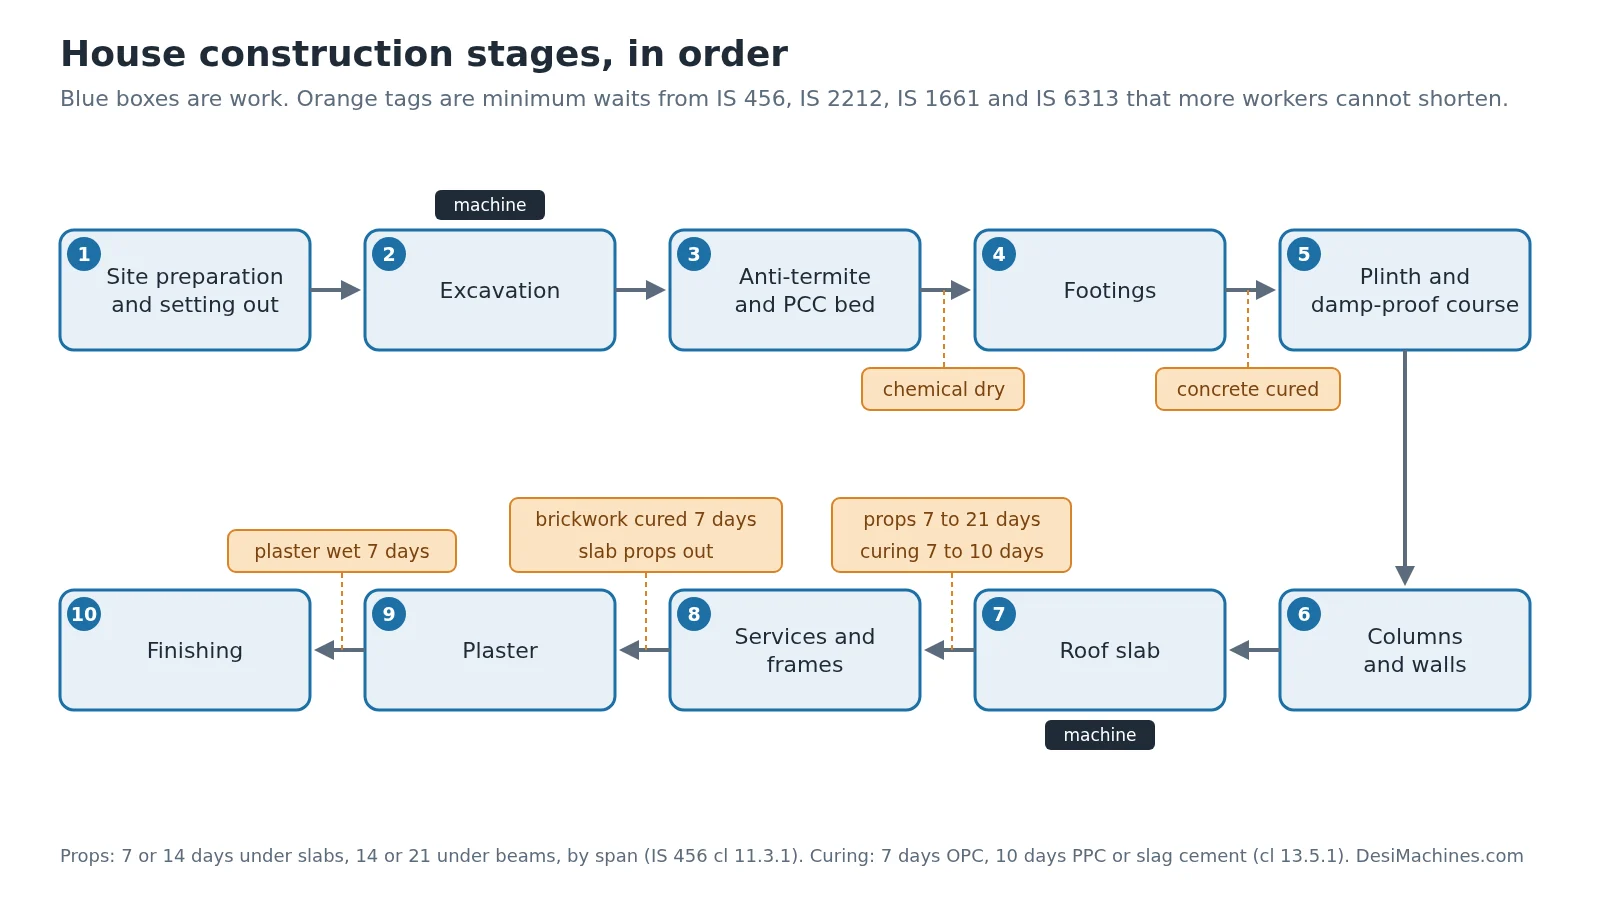
Reading the figure
The blue boxes are work. The orange tags between them are waits that no extra labour can shorten: curing of concrete and brickwork, and the days the props stay under a new slab. The two stages marked with a machine are the ones a backhoe loader, mini excavator or concrete mixer usually does.
What happens before the first trench is dug?
Paperwork and checking come first. The drawings need to be approved by your local body, the plot boundary needs to be fixed by survey, and a soil test tells the engineer how deep the footings must go. None of this costs much next to the building, but a footing redesigned after digging costs days.
Then the site is cleared and levelled. Setting out comes next: the centre line of each wall and the centre of each column is marked on the ground with lime, using pegs and string from a fixed reference point. It is the cheapest stage to check and the most expensive one to get wrong. Measure the diagonals of every room on the ground. If they are equal, the corners are square.
How are the foundation and plinth built?
Excavation is usually the first job a machine does on a house. A backhoe loader such as the JCB 3DX, with a maximum digging depth of 4,770 mm (15.6 ft), reaches a 1.5 m deep footing pit with depth to spare. On a narrow plot between two houses, a 3.7-tonne mini excavator like the Komatsu PC35MR-3 (3,110 mm digging depth, 3,675 kg) gets in where a backhoe cannot turn. Spoil is kept back from the edge of the pits so it does not slide in.
Anti-termite treatment goes in before any concrete. IS 6313 (Part 2), the code for soil treatment against termites (2001 edition), says treatment starts when the pits are ready to take the foundation concrete, and that the concrete is laid only once the chemical has soaked in and the surface is dry. It is not done in rain or on wet soil. The same code treats the backfill against the foundation as it goes in, and the top of the plinth filling again before the floor base is laid.
The order inside this stage is:
- A bed of plain cement concrete (PCC), usually 1:4:8, levels the pit floor so the steel sits on a clean surface.
- Footing steel is placed with the column bars standing up from it, then the footing is cast. The bar bending schedule is the sheet the steel is checked against.
- The column stubs are taken up to plinth level.
- The plinth beam, or plinth masonry on a load-bearing house, is built around the whole house at floor level.
- The pits are backfilled in layers and rammed, and the area inside the plinth is filled and compacted.
- A damp-proof course (DPC) is laid on top of the plinth to stop ground moisture rising into the walls. IS 3067 asks for it to cover the full thickness of the wall.
Backfill is where houses settle later. Soil thrown into a pit in one go and not rammed sinks for years and cracks the floor above it.
Before you book the machine, check its digging depth against your deepest footing plus 300 mm. Compare backhoe loader models and talk to a dealer near you.
In what order are columns, walls and the roof slab built?
On an RCC frame house the frame carries the load, so builders use one of two orders. Some cast the columns to full height and raise the brick walls between them up to lintel level, cast the lintels over the openings, finish the walls to the underside of the beams, and then cast beams and slab together. Others cast the whole frame and slab first and fill in the walls after. Both are sound. On a load-bearing house there is only one order: walls first, because the slab sits on them.
Brick walls go up evenly. IS 2212, the code of practice for brickwork, says no part of a wall should be left more than 1 m lower than the next, and where one part must wait it is stepped back at no more than 45 degrees. Bricks are soaked before use, and the finished brickwork is kept wet for at least seven days.
The slab is the longest single stage. The shuttering (the temporary floor of plates and props the concrete is poured onto) goes up first, then the steel. Before the concrete goes in, the electrical conduits and fan boxes are tied into the slab steel and the pipe sleeves are fixed. IS 2212 asks for sleeves and chases to be left during construction so service lines do not mean cutting finished work later. A slab cast without its conduits has to be cut into later, or wired on the surface.
Casting is usually done in one day so the slab has no cold joint. For a 1,000 sq ft roof slab 125 mm thick, about 11.6 m³ (410 cft) of concrete, a self-loading mixer such as the AJAX ARGO 2000 with a 2.0 m³ drum needs about six batches.
How long do you wait between stages?
The waits come from the codes, and they are minimums. IS 456 gives its stripping times for ordinary Portland cement where the air stays above 15°C, and says to adjust them for other cements and lower temperatures.
| Wait | Minimum | Code and clause |
|---|---|---|
| Anti-termite chemical to foundation concrete | Until soaked in and the surface is dry | IS 6313 (Part 2), clause 6.2 |
| Column and beam side shuttering | 16 to 24 hours | IS 456, clause 11.3.1 |
| Slab bottom shuttering (props refixed at once) | 3 days | IS 456, clause 11.3.1 |
| Beam bottom shuttering (props refixed at once) | 7 days | IS 456, clause 11.3.1 |
| Props under a slab, span up to 4.5 m / over 4.5 m | 7 days / 14 days | IS 456, clause 11.3.1 |
| Props under beams, span up to 6 m / over 6 m | 14 days / 21 days | IS 456, clause 11.3.1 |
| Curing concrete, OPC / PPC or slag cement | 7 days / 10 days (14 recommended) | IS 456, clause 13.5.1 |
| Curing brickwork | 7 days | IS 2212, clause 11.10 |
| Each plaster undercoat, damp cured | 2 days | IS 1661, clause 13.2 |
| Finished plaster kept wet | 7 days | IS 1661, clause 16.2 |
If your cement bag says PPC or PSC, plan on 10 days of curing, not seven. The slab and beam waits are covered clause by clause in shuttering removal time for a slab and curing period for a slab.
The beam props matter most for the timeline. A house with beams up to 6 m long keeps props under them for 14 days after casting, and IS 1661 says inside plaster starts only after the temporary supports of the ceiling are removed. So the rooms under a new slab are closed to plastering for two weeks whatever the size of the crew.
What comes after the slab: services, plaster, floors and finishing?
Services go in before plaster. IS 1661, the code for cement plaster, says plastering does not start until door and window frames are fixed and every pipe and conduit that will be buried in the wall is in place. Chases for wiring and plumbing are cut into the cured brickwork, the pipes are laid, and water lines get a pressure test while they can still be reached.
Plaster follows a set order. The ceiling and inside walls are done wherever the frame and walls are ready and the props are out. Outside plaster starts at the top floor and works down, so that nothing drips on finished work. Brick joints are raked at least 10 mm deep as the wall is built so the plaster grips, and each coat gets its cure before the next. How much cement and sand a wall takes is worked out in plaster quantity calculation.
Finishing is the longest list but the most flexible stage. Roof waterproofing and the waterproof layer under toilet floors go in before the tiles. Floors are laid after the plaster above them, so no mortar falls on new tiles. Door shutters, putty, primer and paint come near the end, then electrical fittings and sanitary fittings. Work outside the house, the septic tank, sump and compound wall, can run alongside this stage. Size the tank before you dig with the septic tank size calculation.
How long does each stage take on a 1,000 sq ft house?
No code fixes how long a house takes. Two things set it: how many workers are on the job, and the waits above. The labour part can be worked out with IS 7272, the Bureau of Indian Standards labour output constants (the work a mason, carpenter or helper does in a day), explained in labour output per day.
Take the plain 1,000 sq ft single-storey RCC house used in the stage wise cost breakdown: about 25.5 m³ of 230 mm brick wall, 57 m² of half-brick wall, about 440 m² of plaster and an 11.6 m³ roof slab.
| Stage | Quantity | IS 7272 output | Labour | With a crew of 3 | Wait after it |
|---|---|---|---|---|---|
| 230 mm brick wall | about 111 m² (25.5 m³) | 4 m² per mason-day | about 28 mason-days | about 12 working days | 7 days wet curing |
| 115 mm half-brick wall | 57 m² | 8.3 m² per mason-day | about 7 mason-days | ||
| Slab shuttering | about 90 m² | 4.3 m² per carpenter-day | about 21 carpenter-days | about 7 working days | 7 to 14 days props, 14 under beams |
| 15 mm plaster | about 440 m² | 12.5 m² inside, 16.7 m² outside per mason-day | 26 to 35 mason-days | 9 to 12 working days | 7 days wet after the last coat |
The 230 mm wall area is the volume divided by the wall thickness (25.5 ÷ 0.23). The plaster range runs from all-outside work to all-inside work, because the mix of the two depends on the plan.
Read the table in two columns. The labour column shrinks if you add masons. The wait column does not move. Three masons finish the walls in about 12 days, and the walls then need a week of curing before plaster. The slab needs a week of shuttering and then holds its props for two weeks. On this small house the code waits after the walls, slab and plaster add up to about four weeks. Some of them overlap, walls curing while the slab is shuttered for example, but no crew size shortens any of them, which is why a stage plan beats a deadline set by guesswork.
Weather moves the numbers too. IS 1661 lets a plaster coat set for one day in summer but two in winter, and IS 456 asks for longer stripping times in cold weather.
Which stages need machines?
Two stages, mostly. Excavation needs a digger, and slab day needs concrete made fast enough to finish the pour before the first batch sets. Everything else on a house is hand work.
A third job turns up at the end: levelling the plot, digging the sump and septic tank, and clearing debris. On most sites the same backhoe loader that dug the footings comes back for it. Plan that second visit when you book the first one. Before you hire or buy, compare backhoe loaders by digging depth and the size of the loader bucket, and ask a dealer about attachments for site cleaning.
Read next: the construction cost guide collects the quantity and cost calculations for every stage above.
Prices, specifications and features are indicative, vary by variant, location and date, and should always be confirmed with the official OEM or authorised dealer before any purchase decision. DesiMachines is not liable for decisions taken on the basis of information that may have changed after publication.
Code references: IS 456 : 2000 Plain and Reinforced Concrete, Code of Practice, clauses 11.3 and 11.3.1 (stripping time), 13.5.1 (moist curing); IS 1661 : 1972 Cement and Cement-Lime Plaster Finishes on Walls and Ceilings, clauses 8.5 (time between coats), 9.3 (fixings and conduits before plaster), 10.1 (sequence), 13.1.2 (raked joints), 13.2 (undercoat curing) and 16.2 (curing); IS 2212 : 1991 Brickwork, clauses 10.1 (soaking), 11.10 (curing), 11.11 (sleeves and chases) and 12.3 (1 m height difference, 45 degree raking back); IS 6313 (Part 2) : 2001 Anti-Termite Measures, Pre-constructional Chemical Treatment, clauses 6.2 and 7.4; IS 3067 : 1988 Damp-Proofing and Waterproofing of Buildings; IS 7272 (Part 1) : 1974 Labour Output Constants, north zone, as tabulated in the labour output guide. Machine figures are as listed in the catalogue in November 2026. The worked example is an illustration; your engineer and local bye-laws decide the design and sequence for your house.
Machines, tenders and news for this industry: Building Construction