
 Excavator
316 models
 Backhoe Loader
54 models
 Crane
68 models
 Concrete Mixer
79 models
 Wheel Loader
65 models
 Compactor / Roller
45 models
 Motor Grader
42 models

 Concrete Pump
66 models
 Skid Steer Loader
11 models


Two hour meters decide when a surface drill rig gets serviced, and the wear on its bits decides the rest. The drilling end runs on percussion hours, which count only the time the rock drill is striking: Atlas Copco’s schedule for its PowerROC T30 E crawler rig sets jobs at every 4, 20, 100 and 200 of them. The engine, compressor, hydraulics and tracks run on engine hours, with jobs at 10, 50, 250, 500 and 1,000.
The bits do not go by hours at all. A button bit is reground when the flat worn on its carbide buttons reaches about a third of the button’s width, and that is checked between holes, not once a week.
This guide is for the owner or operator of a quarry drill, a borewell rig or a DTH piling rig. It covers what to check before every shift, what each service interval includes, how to look after the rig’s air compressor, when and how to regrind a button bit, and how to keep drill rods and the hammer alive. How the down-the-hole hammer itself works is explained in the guide to the DTH hammer.
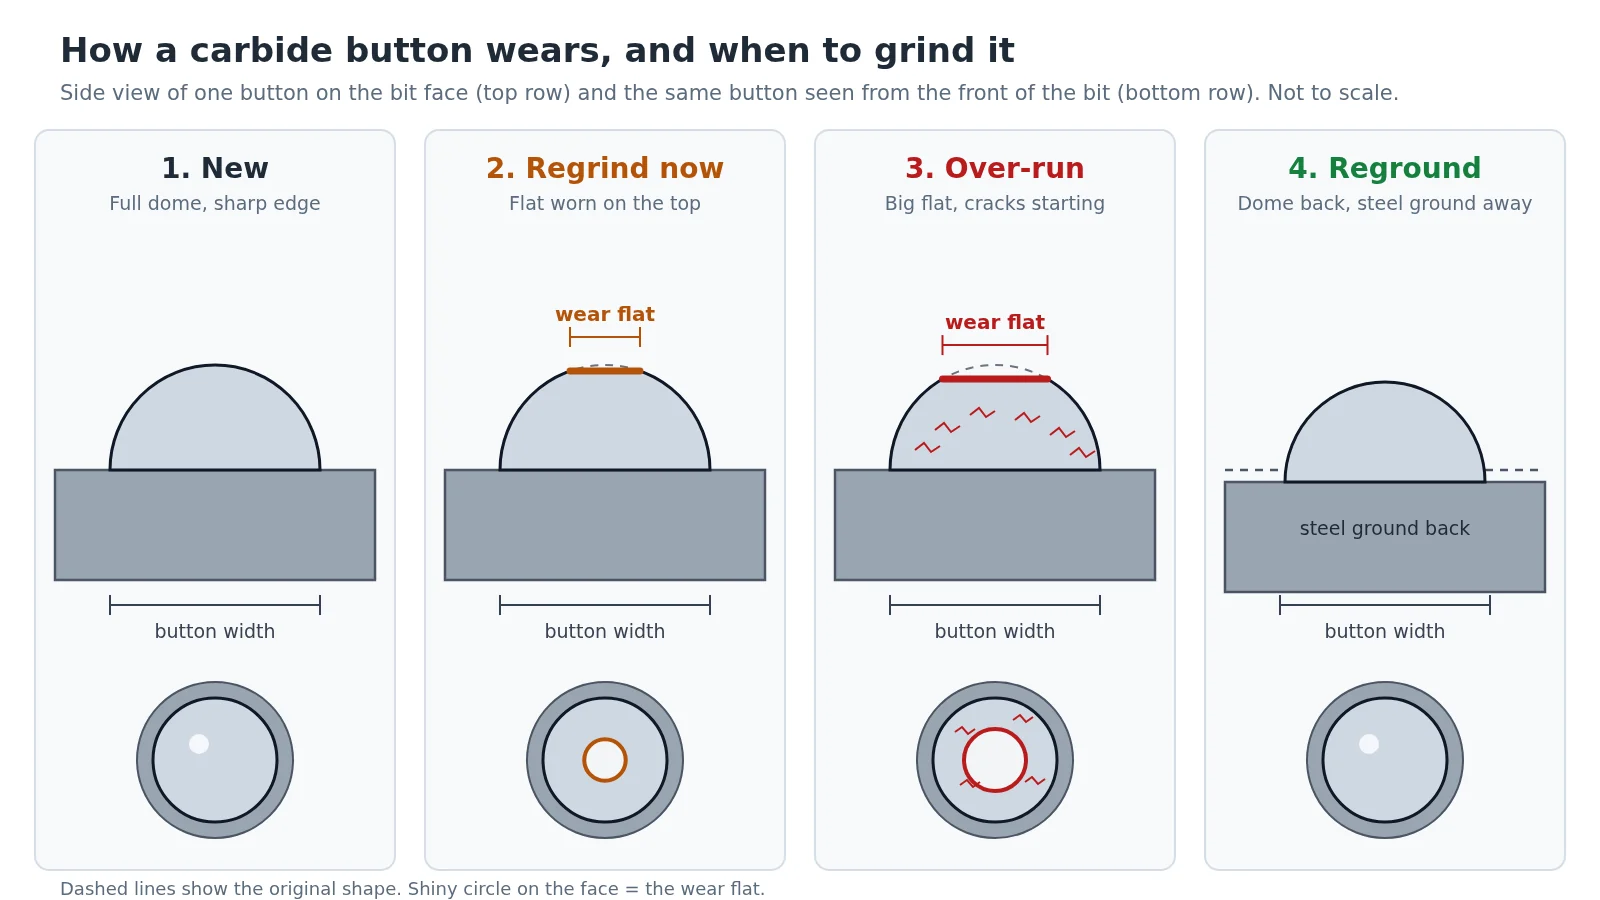
Key to Figure 1
- New: a full rounded dome that crushes rock at a point.
- Regrind now: a flat about one third of the button’s width has worn on top. Mincon and Boart Longyear both put the grinding point here.
- Over-run: the flat is half the width or more, the load on the carbide has turned from compression to shear, and fine cracks are starting. Buttons left like this tend to break.
- Reground: the dome shape is back, and the steel around the button has been ground away so the button stands proud of the bit face again.
How often should a drill rig be serviced?
A drill rig should be serviced at two sets of intervals: one counted in percussion hours for the parts that drill, and one counted in engine hours for the parts that power and move the rig. Atlas Copco’s rigs carry a separate percussion-hour counter for this reason. A rig can idle, tram and position for hours while the rock drill strikes for only part of that time, so a single meter would service the feed and drill steel support far too often or the engine far too rarely.
The table below is Atlas Copco’s own schedule for one crawler top-hammer rig, the PowerROC T30 E (maintenance schedules, edition of October 2013). Your rig’s manual will differ in detail, so treat this as the shape of a real schedule, not as the schedule for your machine.
| Interval | Part of the rig | What the manual asks for |
|---|---|---|
| Every 4 percussion hours | Drill steel support | Grease all 12 nipples |
| Every 20 percussion hours | Feeder (the beam the rock drill slides along) | Adjust the pull and return rope tension; check the feed beam, cradle, hoses and hose drum for wear; check the feed cylinder for leaks; check the rock drill’s bolted joints are tight |
| Every 100 percussion hours | Feeder and drill steel support | Slide pieces at least 4 mm thick; cradle clearance no more than 2 to 4 mm; bearings in the support cylinder lugs no more than 0.5 mm play |
| Every 200 percussion hours | Drill steel support | Check mounting and tighten the bolts |
| Every 10 engine hours | Engine, compressor, hydraulics, rock drill oil tank, emergency stops | Check engine, compressor and hydraulic oil levels; change the hydraulic filters if the return-filter gauge needle is in the red with the oil at 40 °C; fill the rock drill lubricating oil tank; test every emergency stop one at a time |
| Every 50 engine hours | Boom, tracks, radiator, hydraulic tank | Grease the frame, boom and feeder; drain water from the fuel prefilter; clean the radiators; drain water from the hydraulic tank after the rig has stood still for eight hours |
| Every 250 engine hours | Engine, air receiver, tracks, oil tank | Change engine oil, oil filter, fuel prefilter and fine filter; drain water from the air receiver and the lubricating oil tank; set track tension, without over-tightening |
| Every 500 engine hours | Air filters, track gears | Replace the engine and compressor air filter elements; the air filter and the safety filter must both be replaced at least once a year; change the traction gear oil |
| Every 1,000 engine hours | Hydraulic system, compressor | Change the hydraulic oil; change the compressor oil and oil filter; pressure-test the 15 bar (218 psi) safety valve |
Ten engine hours is about one long working day, so many of the 10-hour jobs become part of the daily check. The manual also asks the owner to copy the schedule and “keep a record of each point checked”. That record is what tells you whether a failure came from wear or from a missed service.
The 1,000-hour hydraulic oil change is a large fluid bill. What oil grades cost and how much a machine holds is set out in hydraulic oil price, and the habits that keep the oil clean between changes are in hydraulic system maintenance. A rig with dozens of grease points also needs a decent grease gun, because a nipple that will not take grease gets skipped.
If your quarry is also choosing a machine to load what the holes break, compare mining excavators and talk to a dealer near the site.
What should the operator check before every shift?
Before every shift the operator should walk round the rig with the engine off, check the fluids, drain water from the fuel and air systems, and test the emergency stops. Atlas Copco’s operator instructions for the PowerROC T30 E and for its SmartROC D65 DTH rig both open their daily section the same way: the checks are “carried out by the operator before each shift”.
The daily list in those two manuals comes down to this:
- Look for cracks in welds and metal, wear and damage on the feed holder and its brackets, the feed chain, the hose drum, the boom and the track frames. Do this with the engine stopped.
- Check the engine oil, coolant, hydraulic oil and rock drill lubricating oil levels.
- Drain water from the fuel prefilter.
- Drain water from the compressor tank. The SmartROC manual asks for the rig to stand still for one hour first, and for the pressure to be let out before the filler plug comes off.
- Check track tension and look for loose bolts and nuts.
- Test the emergency stop buttons and wires. The manuals say this is done before each shift and again after tramming.
- Check that oil is reaching the drill (next paragraph).
- If there is dust at the hole, check the dust collector’s filter, its suction hose and the gasket in the drill steel support.
The oil check differs by rig type. On a top-hammer rig, oil should trickle out between the front of the rock drill and the shank adapter. On a DTH rig the oil travels down the pipes, so the SmartROC manual uses a simple test: hold a plank in front of the bit, turn on the flushing air, and the plank should turn oily after a short time. A dry plank means the lubricator is empty, blocked or set too low.
The manuals add one rule about water. If water starts coming out of the hole, switch the dust collector off, because wet dust ruins its filters. Water mist systems have their own filter, which the SmartROC manual says should be taken apart and cleaned regularly. How quarries keep dust down across drilling and hauling is covered in dust suppression in mines.
How do you service the air compressor on a drill rig?
A drill rig’s compressor is checked every day for oil level and gauges, and on a typical power take-off screw compressor it gets a new oil filter at 500 hours, new oil at 1,000 hours and a new oil separator at 2,000 hours. On a DTH rig it matters as much as the engine, because the hammer runs on its air.
Ingersoll Rand’s manual for its XHP1070CMH and XHP1250CMH compressor modules, which are built to be driven off an engine’s power take-off (the manual is now hosted by Doosan Portable Power), gives a clear example.
| When | Job |
|---|---|
| Daily | Check compressor oil level, gauges and lamps, and the air cleaner service indicators |
| Weekly | Empty the air cleaner precleaner dumps |
| Monthly | Check oil, air and intake hoses; test the automatic shutdown system; check the oil cooler outside |
| 500 hours or 3 months | Replace the compressor oil filter element; clean the oil cooler; check fasteners; change air cleaner elements when the indicator says so |
| 1,000 hours or 6 months | Replace the compressor oil |
| 2,000 hours or 12 months | Replace the oil separator element; test the shutdown switch settings; clean the scavenger orifice |
The same manual says these periods “should be reduced” in very hot, cold, dusty or wet conditions, which covers a quarry in the Indian summer and many borewell sites in the monsoon. It also says that before anything more than a visual check, you disconnect the engine battery and open the manual blow-down valve, so the machine cannot start and no stored air is left in it.
The air receiver (the pressure tank) needs one more thing that is easy to forget. In a mine or quarry under the Mines Act, regulation 173(3) of the Metalliferous Mines Regulations, 1961 asks for every air receiver to be hydraulically tested at one and a half times its maximum working pressure, after every repair and in any case at least once every three years, with the result written in a bound book. A fuller compressor schedule, including the separator and common faults, is in the guide to air compressor maintenance, and how much air each hammer size needs is worked out in air compressor cfm calculation.
When should a button bit be reground?
A button bit should be reground when the flat worn on its buttons reaches about one third of the button’s diameter. Mincon, an Irish maker of DTH hammers and bits, puts it this way in its April 2026 article on extending bit life in blast-hole drilling: sharpening “should take place when approximately one-third of the carbide face becomes flat”. Boart Longyear gives the same one-third limit for top-hammer bits. Rockmore International’s DTH troubleshooting guide is stricter and grinds at a quarter.
Past that point the bit costs more than it saves. Rockmore explains that as the flat grows, the load on the carbide changes from compressive to shear, a load the button is not shaped to carry. Mincon says stress builds up and the risk of failure rises. Boart Longyear adds that a blunt bit sends part of each blow back up the drill string instead of into the rock, which wears the rods and the rock drill and makes holes wander.
How often that is depends on the rock. Mincon advises checking the bit face “between holes”, especially in abrasive ground, and keeping a record of wear in each formation so you learn the right grinding interval for your own quarry. Abrasive rock wears buttons faster, so the interval in one quarry can be very different from the next.
| What you see | What it means | What to do |
|---|---|---|
| A shiny flat on top of the buttons, about a third of the button wide | Normal wear has reached the grinding point | Regrind now |
| Flats half the button wide or more | The bit has been over-run; load on the carbide has turned to shear | Regrind at once and shorten the interval next time |
| Fine network of cracks on the buttons, like snakeskin | Fatigue from drilling non-abrasive rock; the cracks grow and chunks break away | Grind until the cracks are completely gone, even if the flat is small |
| Outer (gauge) buttons worn down to the width of the bit body | The bit is losing diameter and will start to bind in the hole | Grind the gauge row; check the bit diameter before using it again |
| Broken or missing buttons | Often the result of over-drilling | Take the bit out of service; Rockmore’s advice is to discard worn out or damaged bits, and grind earlier next time |
The Indian standard on this, IS 8486:1977, was written for one-piece carbide-tipped drill steels (integral stems) rather than button bits, but its reasoning on wear and grinding carries over. It warns that a worn, rounded edge leaves the bit narrower at the front than behind (an anti-taper) and that this “may result in rod breakage”. It also advises a light regrind after about 150 m of drilling in soft rock even when no wear shows, to take off the surface cracks.
How is a button bit reground, and when is it scrapped?
A button bit is reground by grinding the flat off each carbide button to bring back its rounded shape, then grinding away some of the steel around the buttons so they stand out from the bit face again. It is done on a bit grinding machine, either with a shaped diamond cup that fits over each button or with a grinding wheel.
The two tools work differently. A diamond cup is made to cut carbide, not steel, so Boart Longyear says it only works well when the buttons still stand out enough. Cup profiles also wear and drift, so a cup that is not checked slowly grinds the wrong shape. A grinding wheel can take off the worn carbide and the surrounding steel in the same pass; that is the point of a 1993 US patent on button-bit sharpening (5,182,971).
Whichever tool you use, these are the rules the makers and the Indian standard give:
- Grind off the whole flat and any snakeskin cracks, and bring the button back to its original profile.
- Grind steel away around the buttons so they stand proud, but not too far. Rockmore says a button should not stick out more than three quarters of its diameter, and Boart Longyear warns that a button with too little steel round it breaks easily.
- Use plenty of water, and do not quench a hot button suddenly. IS 8486 says a button that looks shiny and “burnt” has been overheated, and cracks follow.
- Do not take off more than you need. IS 8486 works out that grinding 0.5 mm too much on each side at every regrind cuts a bit’s life to 56 percent, and 1 mm too much cuts it to 39 percent.
- Measure the bit diameter after grinding. IS 8486 asks for a sliding caliper.
- Wear eye protection and a dust mask, and grind where there is ventilation. Boart Longyear warns that carbide grinding dust can damage the lungs.
A bit is scrapped, not reground, when its gauge (outside) diameter has fallen below the smallest size the hole allows, when the steel body is cracked, or when buttons are broken or missing; Rockmore’s troubleshooting guide simply says to discard worn out or damaged bits. The 1993 patent notes that many button bits are thrown away because the gauge has fallen below a certain diameter. There is no one figure for the minimum diameter: it depends on the hammer and the hole, so take it from the bit maker’s sheet. Bit faces and button shapes for different rock are compared in the DTH hammer guide.
How do you look after drill rods, pipes and the DTH hammer?
Drill rods and pipes last longest when their threads are kept clean, lightly greased and capped, and a DTH hammer lasts longest when it gets enough oil and is rebuilt by measurement, not by the calendar.
For rods and pipes, Mincon gives a short list in its 2025 and 2026 articles:
- Fit protective caps on every exposed thread in storage and on the truck.
- Grease only the pin (male) thread, not the box, and only a light layer.
- Tighten and loosen a new pipe thread three times before drilling with it.
- Turn the pipes round in the rack from time to time so they wear evenly.
- Inspect the saver subs regularly and keep them clean; they protect the thread connections on the rig.
Rockmore’s hammer guide adds that the chuck (driver sub) threads should be greased again at every bit change.
Straightness matters too. IS 9026:2004, the Indian standard for rope-threaded percussive drilling equipment, says a rod laid on a flat surface and turned must not rise more than 3 mm off it over a length of up to 2 m. On a top-hammer rig, the US Federal Highway Administration’s rock blasting manual (1991) notes that the shank and coupling threads wear faster and are replaced more often.
A DTH hammer is rebuilt by measuring it. Mincon says critical parts should be measured against the maker’s wear limits before they are reused, and that changing a worn chuck in time saves the outer wear sleeve. Rockmore’s hammer guide prints a discard table: on its ROK 400, for example, the wear sleeve starts at 3.858 inches (98.0 mm) across and is scrapped at 3.504 inches (89.0 mm). Robit’s hammer manual says to measure the sleeve with a micrometer and replace it below the minimum.
Oil is the other half. Rockmore puts the minimum at 0.2 litres an hour for every 3 m³ a minute of air (about a third of a pint per 100 cfm). By that rule, a hammer drawing 600 cfm (about 17 m³ a minute) needs at least 1.1 litres of rock drill oil an hour. Robit says to add 50 percent when drilling with water or foam, to size the lubricator for a full shift, and warns that if the oil supply stops, the piston will quickly seize. Its manual lists three causes of early internal wear: not enough or the wrong oil, dirt getting into the hammer, and poor servicing and storage.
What do the warning signs on a drill rig mean?
Most early warnings on a drill rig show up as slower drilling, a bit that sticks, a gauge in the red or a dry plank, and each one points to a short list of causes.
| Sign | Likely cause | First check |
|---|---|---|
| Holes take longer than usual | Blunt bit, low air pressure, or dirt inside the hammer | Look at the button flats; check the compressor discharge pressure; strip and clean the hammer if neither explains it |
| Bit binds or sticks in the hole | Gauge buttons worn so the bit is no wider than its body | Pull the bit, measure it, grind the gauge or change it |
| Holes wander off line, buttons break | Bit being run past its grinding point | Shorten the grinding interval; check feed force is not too high |
| Hydraulic return-filter gauge in the red | Filters clogged (the gauge reads true only once the oil is at 40 °C) | Change the hydraulic filters |
| No oil at the shank adapter, or the plank stays dry | Rock drill oil tank empty or lubricator blocked | Fill and bleed the lubricator before drilling another metre |
| Dust at the collar with the collector running | Collector filter, suction hose or drill gasket | Check those three; switch the collector off if the hole is wet |
Robit’s hammer manual gives “re-grind or change bit” as the fix for a blunt bit, and Mincon’s July 2026 note on hammer efficiency adds that pushing or turning harder than needed usually lowers efficiency and raises wear. A slow hole is not fixed by more feed force.
What do Indian mine rules say about drill rig maintenance?
In a mine or a stone quarry under the Mines Act, the Metalliferous Mines Regulations, 1961 make drill rig upkeep a legal duty as well as a cost question. Four of its rules touch the rig directly:
- Regulation 124(6)(b): drill with sharp bits of proper shape, keep suitable pressure on them, keep holes clear of cuttings, and put water on the cutting edge; on pneumatic drills, turn the water on before the air.
- Regulation 172: all machinery must be of good construction and “properly maintained”.
- Regulation 174(3): no one may repair, adjust, clean or lubricate machinery in motion where there is a risk of injury.
- Regulation 176(3): the person in charge of a machine must see that it is in proper working order before starting work, and report any defect to the manager or engineer straight away.
The three-yearly air receiver test under regulation 173(3) is covered in the compressor section. A replacement for these regulations under the Occupational Safety, Health and Working Conditions Code, 2020 was published as a draft in 2026, so check which set applies to your lease. A rig drilling a water borewell is not working in a mine, so there the rig maker’s manual is the rule book.
Where to read next
The rig families that carry these hammers and bits, from borewell trucks to crawler quarry drills, are explained in the guide to the drilling rig machine. Hole size, depth and straightness for blasting are covered in blast hole drilling, and the choice between DTH and rotary rigs for piles in DTH piling vs rotary piling. Machines, tenders and companies in stone quarrying are listed on the quarry machinery page, and more drilling guides are in the drill rig guide section.
The machines that load and haul the blasted rock are in the range of mining excavators, where you can compare models and connect with a dealer.
Sources: rig service intervals are from Atlas Copco’s PowerROC T30 E maintenance schedules (PM 9852 3252 01, October 2013) and its PowerROC T30 E and SmartROC D65 operator instructions (October 2013 and January 2017); compressor intervals are from Ingersoll Rand’s XHP1070CMH/XHP1250CMH operating and maintenance manual (book 22077473, Rev A). Bit grinding points are from Mincon’s articles on extending bit life (1 April 2026), extending hammer life (11 June 2026), optimising hammer efficiency (14 July 2026) and lowering drilling costs (20 August 2025); Boart Longyear’s “Check your buttons” (November 2017); Rockmore International’s DTH failure troubleshooting guide (May 2020) and ROK hammer operation and service guide (revised March 2024); Robit’s Hyper 125/300 hammer manual; US patent 5,182,971 (1993); IS 8486:1977 and IS 9026:2004 from the Bureau of Indian Standards; and the US Federal Highway Administration’s Rock Blasting and Overbreak Control manual (FHWA-HI-92-001, 1991). Legal points are from the Metalliferous Mines Regulations, 1961. All were read in November 2026. No prices are quoted, because drill rigs, bits and hammers are not listed on DesiMachines.
Prices, specifications and features are indicative, vary by variant, location and date, and should always be confirmed with the official OEM or authorised dealer before any purchase decision. DesiMachines is not liable for decisions taken on the basis of information that may have changed after publication.